
LED Digital Clock Instruction
Parent Category: PROFESSIONAL GROWTH NETWORK (PGN)
Category: Personal Growth & Self-Development
Article Code: GRN-082
Applicable Models: DS-6683 / 5522
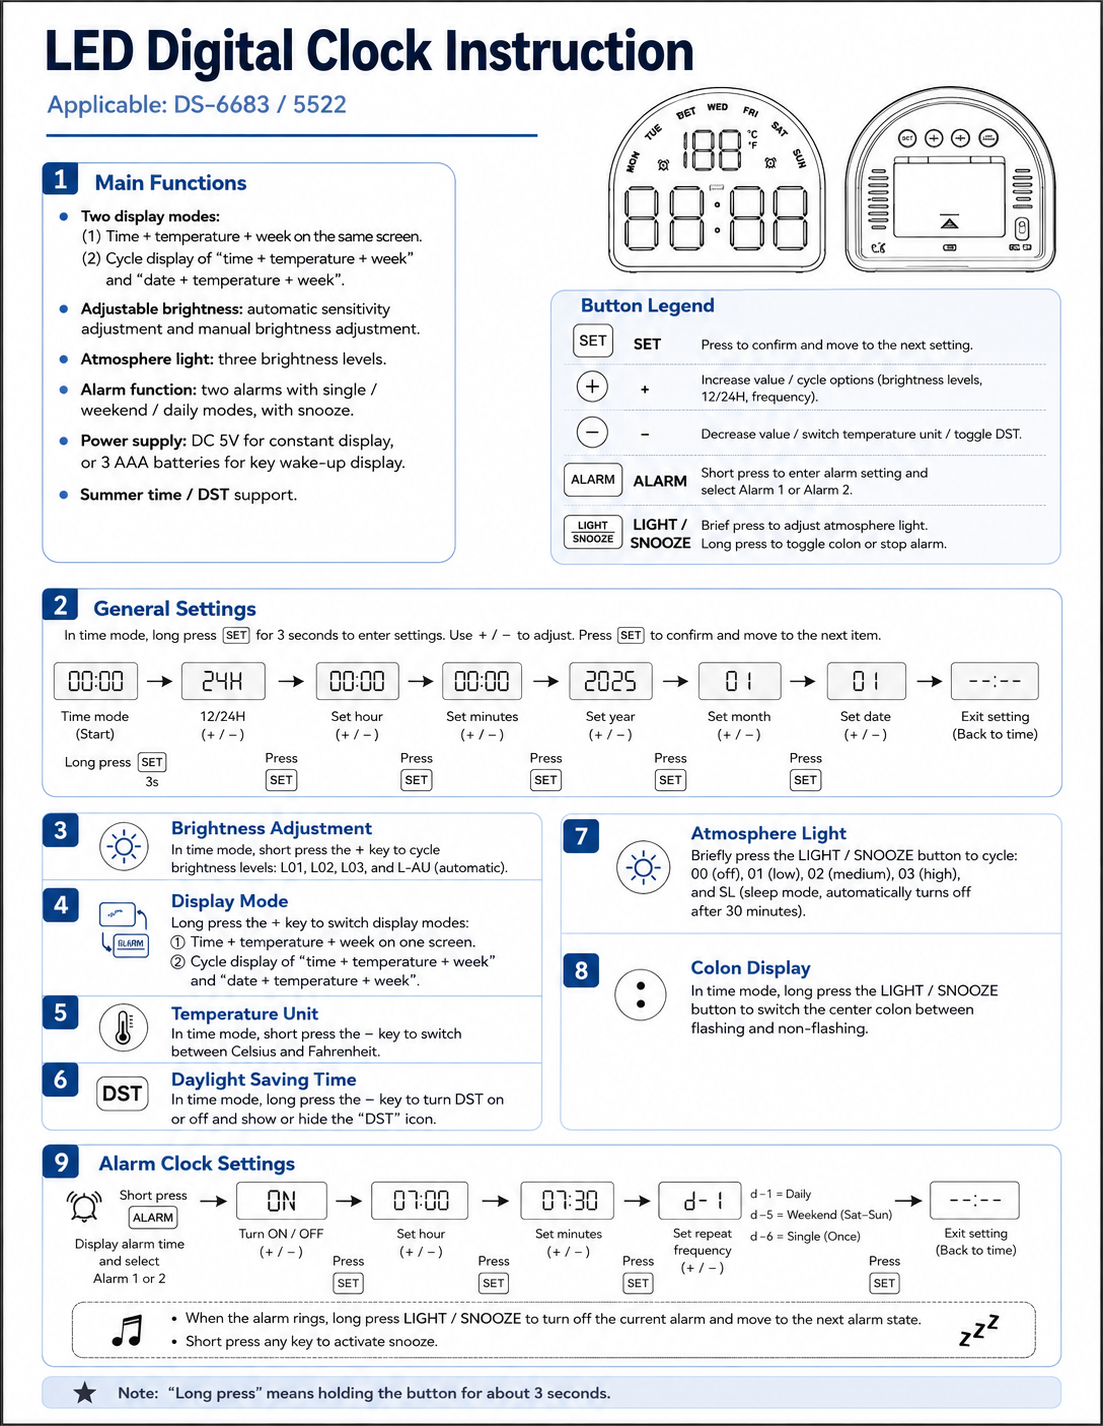
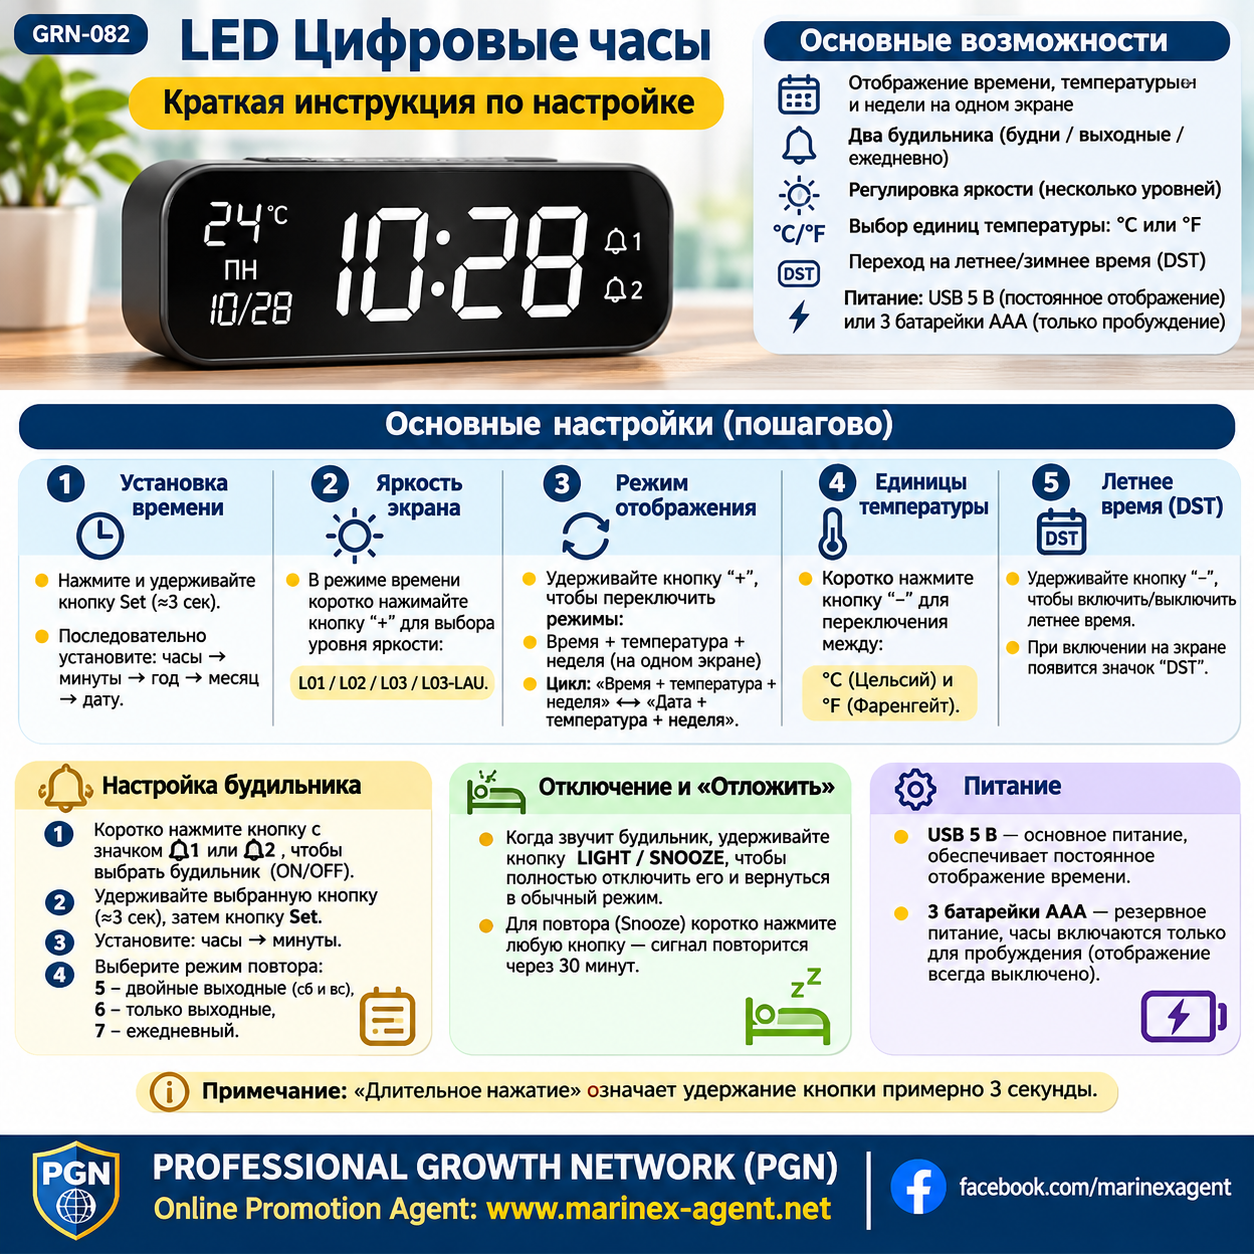
This LED digital clock combines time, temperature, weekday, date, brightness control, dual alarms, snooze, daylight saving time, and several display modes in one compact device.
This guide summarizes the main functions and explains the basic settings step by step.
1. Main Functions
The clock provides several useful everyday functions:
- Two display modes
- Time, temperature, and weekday display
- Date display
- Adjustable brightness
- Automatic brightness sensitivity
- Three atmosphere-light brightness levels
- Two independent alarms
- Single, weekend, and daily alarm modes
- Snooze function
- Celsius and Fahrenheit temperature units
- Daylight Saving Time support
- DC 5V power supply
- Backup operation with 3 AAA batteries
When powered by DC 5V, the display can remain constantly visible.
When powered only by AAA batteries, the clock normally uses a key wake-up display mode to conserve power.
2. Button Functions
The main buttons are:
SET
Used to confirm a setting and move to the next option.
+
Used to increase values or cycle through available options.
−
Used to decrease values, switch temperature units, and control DST.
ALARM
Used to select and configure Alarm 1 or Alarm 2.
LIGHT / SNOOZE
Used to adjust atmosphere-light settings and control snooze or alarm behavior.
For several functions, a long press means holding the button for approximately 3 seconds.
3. General Time and Date Settings
To enter the main settings:
- Make sure the clock is in normal time mode.
- Press and hold SET for about 3 seconds.
- Use + / − to change the selected value.
- Press SET to confirm and move to the next setting.
The sequence is:
12/24-hour format → Hour → Minutes → Year → Month → Date → Exit
After completing the final setting, the clock returns to normal time mode.
4. 12/24-Hour Time Format
The clock supports both:
- 12-hour format
- 24-hour format
Enter the general settings menu and use + / − to select the preferred format.
Press SET to confirm.
5. Brightness Adjustment
In normal time mode, briefly press the + button to cycle through brightness levels.
Available settings include:
- L01
- L02
- L03
- LAU — automatic brightness adjustment
The automatic mode allows the display to react to surrounding light conditions.
6. Display Modes
Press and hold the + button to switch between the two display modes.
Mode 1:
Time + Temperature + Weekday displayed together.
Mode 2:
The display cycles between:
- Time + Temperature + Weekday
- Date + Temperature + Weekday
This second mode is useful when you want the clock to display more information automatically.
7. Temperature Unit
In normal time mode, briefly press the − button to switch between:
- °C — Celsius
- °F — Fahrenheit
The clock will immediately display the temperature using the selected unit.
8. Daylight Saving Time
The clock supports Daylight Saving Time.
In time mode:
- Press and hold the − button.
- DST will switch on or off.
- When enabled, the DST icon appears on the display.
This function is useful for seasonal time changes.
9. Atmosphere Light
Briefly press the LIGHT / SNOOZE button to cycle through atmosphere-light modes.
Available settings include:
- 00 — Off
- 01 — Low brightness
- 02 — Medium brightness
- 03 — High brightness
- SL — Sleep mode
In SL mode, the atmosphere light automatically turns off after approximately 30 minutes.
10. Colon Display
The center colon between the hour and minute digits can be displayed in two ways:
- Flashing
- Non-flashing
In normal time mode, press and hold the LIGHT / SNOOZE button to switch between the two modes.
11. Alarm Clock Settings
The clock supports two separate alarms.
To configure an alarm:
- Briefly press ALARM to display the alarm time.
- Select Alarm 1 or Alarm 2.
- Turn the selected alarm ON or OFF.
- Press SET to enter the alarm settings.
- Set the hour.
- Press SET.
- Set the minutes.
- Press SET.
- Select the alarm frequency.
- Press SET to finish.
The frequency settings include:
- d-1 — Daily
- d-5 — Weekend (Saturday–Sunday)
- d-6 — Single / One-time alarm
The clock then returns to normal time mode.
12. Turning Off the Alarm and Snooze
When the alarm rings:
- Press and hold LIGHT / SNOOZE to stop the current alarm completely.
- Briefly press any key to activate the snooze function.
The snooze function temporarily stops the alarm and allows it to ring again later.
13. Power Supply
The clock can operate using two power options.
DC 5V Power
This is the recommended main power source.
It provides:
- Continuous display
- Normal brightness operation
- Full everyday functionality
3 AAA Batteries
Battery power acts mainly as backup power.
When operating only on batteries:
- The display is normally off
- The screen wakes when a button is pressed
- This helps conserve battery energy
Conclusion
The DS-6683 / 5522 LED digital clock combines several useful functions in one device:
Time → Date → Temperature → Weekday → Brightness → Dual Alarm → Snooze → DST
The most important control principle is simple:
Use SET to confirm, + / − to adjust values, ALARM to manage alarms, and LIGHT / SNOOZE for light and alarm functions.
Once the basic button logic is understood, the clock is simple to configure and convenient for everyday use.
PROFESSIONAL GROWTH NETWORK (PGN)
Online Promotion Agent: www.marinex-agent.net
facebook.com/marinexagent
Article Code: GRN-082