
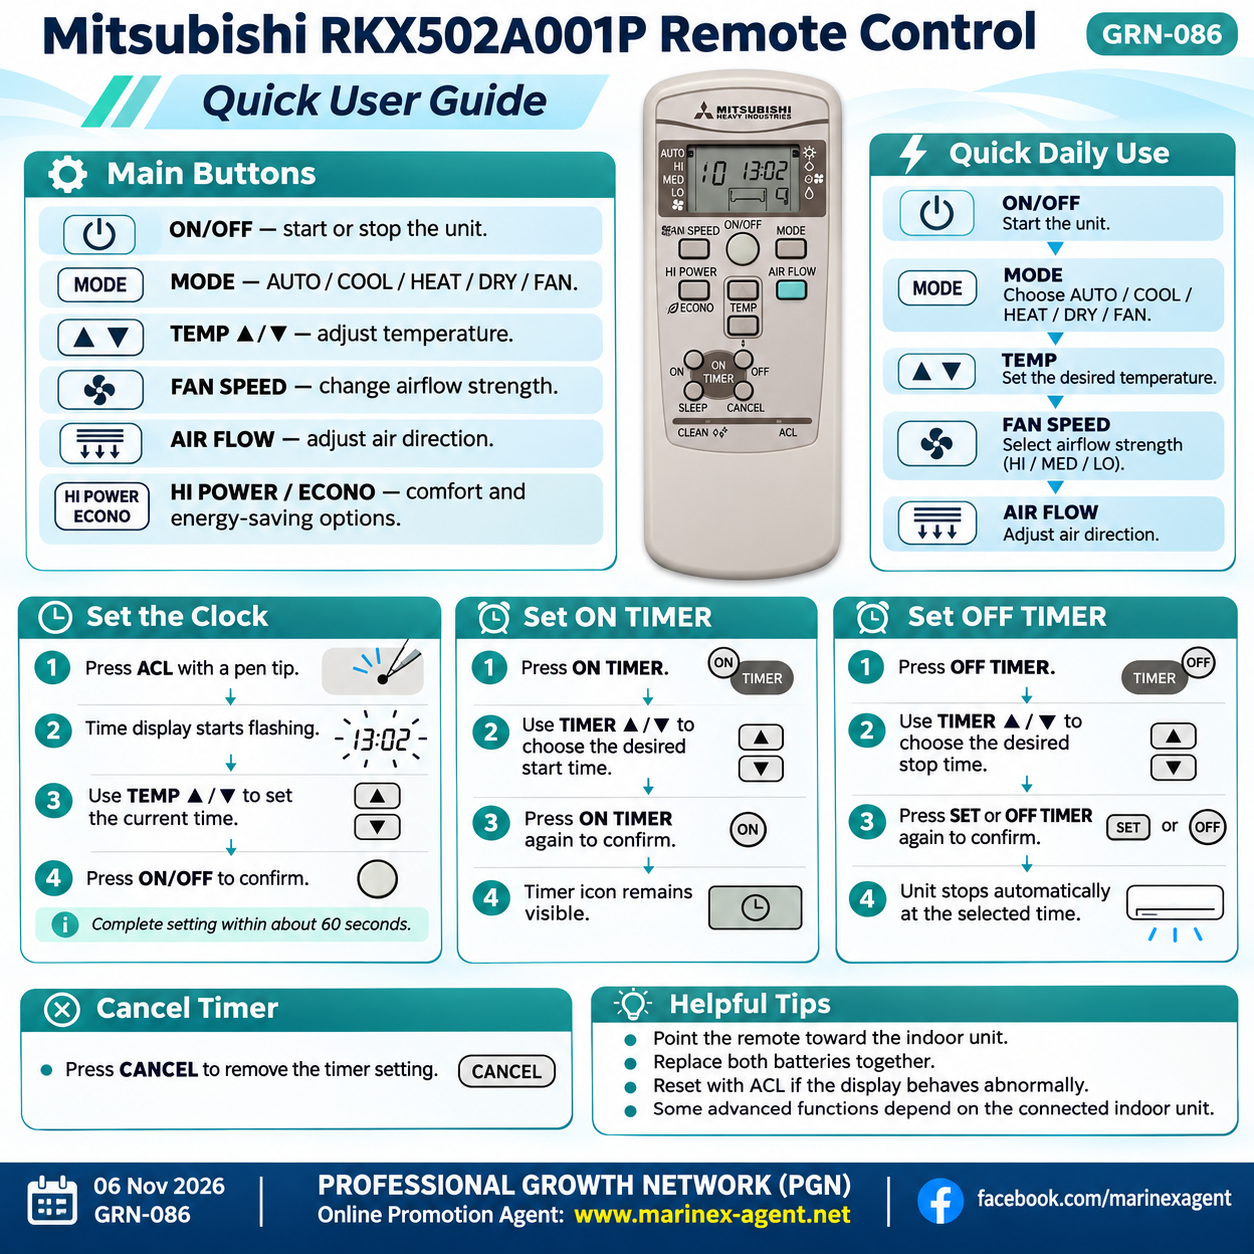
Mitsubishi RKX502A001P
Remote Control: User Guide
Parent Category: PROFESSIONAL GROWTH NETWORK (PGN)
Category: Computer Skills & Digital Literacy / Personal Growth & Self-Development
Article Code: GRN-086
The Mitsubishi Heavy Industries RKX502A001P is an infrared remote control used with compatible Mitsubishi Heavy Industries air-conditioning systems. It is associated with SRK-ZMP-S indoor units and related compatible models.
This guide explains the main everyday functions of the remote control in simple terms.
1. Installing the Batteries
The remote control uses two AAA / R03 (UM-4) batteries.
To install them:
- Open the battery compartment on the back of the remote.
- Insert two batteries.
- Match the + and − polarity markings correctly.
- Close the battery compartment.
If the display becomes weak or the operating range decreases, replace both batteries at the same time. Do not mix old and new batteries.
2. Turning the Air Conditioner On and Off
Point the remote control toward the indoor unit.
Press the ON/OFF button once to start operation.
Press it again to stop the air conditioner.
For reliable operation, make sure there are no obstacles between the remote control and the signal receiver on the indoor unit.
3. Selecting the Operating Mode
Use the MODE button to select the required operating mode.
Depending on the connected air-conditioning unit, available modes may include:
- AUTO — automatic operation
- COOL — cooling
- HEAT — heating
- DRY — dehumidification
- FAN — air circulation without active heating or cooling
The selected mode appears on the LCD display.
4. Setting the Temperature
Use the TEMP ▲ / ▼ buttons to increase or decrease the desired temperature.
Press:
- ▲ to increase the set temperature
- ▼ to decrease it
The indoor unit will then regulate its operation to maintain the selected temperature.
5. Adjusting the Fan Speed
Use the FAN SPEED button to change the airflow intensity.
Depending on the indoor unit, the available settings may include:
- Auto
- Low
- Medium
- High
A lower fan speed provides quieter operation, while a higher setting circulates air more quickly.
6. Adjusting Airflow Direction
The remote may provide flap or swing controls for changing the direction of the outgoing air.
Use the airflow or AIR FLOW / SWING controls to:
- direct air upward or downward;
- activate automatic flap movement;
- select a comfortable fixed airflow position.
Avoid directing strong cold airflow continuously toward people.
7. Using AUTO Airflow Functions
Some compatible Mitsubishi systems support automatic airflow functions.
Where available, the remote may include options such as 3D AUTO, allowing the air conditioner to adjust airflow automatically for more even room distribution.
The exact behavior depends on the indoor unit connected to the RKX502A001P.
8. Setting the Clock
The remote control includes an internal clock used for timer functions.
A common setup procedure is:
- Press the recessed ACL reset button if required.
- Use the temperature adjustment buttons to set the time.
- Confirm the setting using the appropriate control on the remote.
The clock should be set correctly before using ON/OFF timers.
9. Using the ON Timer
The ON TIMER function allows the air conditioner to start automatically at a selected time.
Typical use:
- Select the ON timer function.
- Set the desired start time.
- Confirm the timer.
- Check that the timer indicator appears on the remote display.
This is useful when you want the room to reach a comfortable temperature before you arrive or wake up.
10. Using the OFF Timer
The OFF TIMER allows the air conditioner to stop automatically.
You can use it:
- before going to sleep;
- when leaving the house;
- when you want to limit operating time.
Set the desired stopping time and confirm the timer.
11. Sleep Function
Compatible Mitsubishi systems may provide a SLEEP function.
This mode is designed for more comfortable night operation and may gradually adjust temperature and fan behavior.
It can help reduce unnecessary energy consumption while maintaining comfort during sleep.
12. Economy Operation
If the connected air conditioner supports an ECONO / ECONOMY mode, it can reduce power consumption by limiting maximum output.
This mode can be useful when:
- the room is already close to the desired temperature;
- maximum cooling or heating is unnecessary;
- lower energy consumption is preferred.
13. High-Power Operation
Some compatible units include a HI POWER mode.
This function temporarily increases air-conditioning output to cool or heat the room more quickly.
It is useful when a rapid temperature change is required.
After the room approaches the desired temperature, normal operation is usually more efficient.
14. Resetting the Remote Control
If the display becomes abnormal or the remote does not operate correctly, use the recessed ACL button.
Press it carefully with a pen tip or similar pointed object.
This resets the remote control electronics and may clear abnormal display behavior.
After a reset, you may need to set the clock again.
15. If the Remote Control Does Not Work
If the indoor unit does not respond:
- Check the batteries.
- Confirm that the batteries are installed with correct polarity.
- Replace weak batteries.
- Point the remote directly toward the indoor unit.
- Remove obstacles between the remote and the receiver.
- Move closer to the air conditioner.
- Press ACL if the display appears abnormal.
If the remote works but the air conditioner still does not respond, the problem may be with the indoor unit rather than the remote control.
16. Cleaning and Storage
Clean the remote control with a soft, dry cloth.
Do not use:
- water;
- liquid cleaning chemicals;
- abrasive materials.
If the remote will not be used for a long period, remove the batteries to reduce the risk of battery leakage and internal damage.
17. Compatibility
The RKX502A001P is specifically listed for Mitsubishi Heavy Industries SRK-ZMP-S series indoor units in Mitsubishi compatibility information.
Replacement remotes sold under the RKX502A001P designation may also list compatibility with several related Mitsubishi remote-control families. Therefore, some buttons or functions may differ depending on the exact air-conditioning unit.
Quick Daily Operation
For normal everyday use, the basic sequence is:
ON/OFF → MODE → TEMPERATURE → FAN SPEED → AIRFLOW
For automatic operation:
Set Mode → Set Temperature → Adjust Fan → Adjust Airflow
For scheduled operation:
Set Clock → ON Timer / OFF Timer → Confirm
Conclusion
The Mitsubishi RKX502A001P remote control provides straightforward control over compatible Mitsubishi Heavy Industries air-conditioning systems.
Its main everyday functions include:
Power → Operating Mode → Temperature → Fan Speed → Airflow → Timers → Comfort Functions
For most users, the essential controls are simple:
- ON/OFF — start or stop the unit;
- MODE — choose cooling, heating, dry, fan, or automatic operation;
- TEMP ▲ / ▼ — adjust temperature;
- FAN SPEED — regulate airflow;
- AIR FLOW / SWING — control airflow direction;
- TIMER — schedule automatic start and stop;
- ACL — reset the remote if necessary.
Some advanced features depend on the exact Mitsubishi indoor unit, so the functions available on your system may differ slightly from those described above.
PROFESSIONAL GROWTH NETWORK (PGN)
Online Promotion Agent: www.marinex-agent.net
facebook.com/marinexagent
Как установить время на данном ПДУ
На ПДУ Mitsubishi Heavy Industries RKX502A001P время обычно устанавливается так:
- Вставьте батарейки и включите дисплей пульта.
- Найдите маленькую утопленную кнопку ACL.
- Нажмите ACL тонким предметом, например кончиком ручки. После сброса дисплей пульта перейдёт в исходное состояние.
- Найдите кнопку установки времени/часов. На пультах этой серии она может быть обозначена значком часов / CLOCK или быть связана с настройкой TIMER.
- Нажмите её, чтобы значение времени на дисплее начало мигать.
- Используйте кнопки TEMP ▲ / ▼ или + / − для изменения времени:
- одна кнопка увеличивает значение;
- другая уменьшает;
- при удержании значение меняется быстрее.
- Сначала установите часы.
- Затем перейдите к минутам и установите их.
- После установки правильного времени ещё раз нажмите кнопку CLOCK / SET / TIMER, чтобы подтвердить.
- Убедитесь, что цифры перестали мигать — это означает, что время сохранено.
Практически схема такая:
ACL → CLOCK → часы → минуты → подтверждение
Важно: ACL сбрасывает настройки пульта, поэтому после его нажатия может потребоваться заново установить часы и таймеры.
Для установки времени на этом ПДУ:
- Найдите внизу маленькое отверстие ACL.
- Нажмите ACL кончиком ручки.
- Время на дисплее начнёт мигать.
- Кнопками TEMP ▲ / ▼ установите нужное время.
- После установки нажмите большую круглую кнопку ON/OFF.
- Цифры перестанут мигать — время сохранено.
Важно: после нажатия ACL нужно завершить установку примерно в течение 60 секунд, иначе время может не сохраниться.
То есть для вашего пульта схема очень простая:
ACL → TEMP ▲/▼ → ON/OFF.
Что именно нажать, в каком порядке, чтобы установить таймер на определенное время.
На Mitsubishi Heavy Industries RKX502A001P есть два основных таймера:
- ON TIMER — кондиционер включится к заданному времени.
- OFF TIMER — кондиционер выключится в заданное время.
Как установить ON TIMER, например на 08:00
- Убедитесь, что текущее время на пульте установлено правильно.
- Нажмите кнопку ON TIMER.
- На дисплее начнёт мигать символ ON TIMER.
- Кнопками ▲ / ▼ TIMER выставьте 08:00.
- Ещё раз нажмите ON TIMER для подтверждения.
- Значение перестанет мигать — таймер установлен.
- На внутреннем блоке загорится жёлтый индикатор таймера.
Схема:
ON TIMER → ▲/▼ установить время → ON TIMER подтвердить
Важно: кондиционер может фактически начать работу за 5–60 минут до 08:00, чтобы к 08:00 помещение уже достигло нужной температуры. Это нормальная логика Mitsubishi.
Как установить OFF TIMER, например на 22:30
- Если кондиционер выключен — сначала включите его кнопкой ON/OFF.
- Нажмите OFF TIMER.
- Значение времени начнёт мигать.
- Кнопками ▲ / ▼ TIMER установите 22:30.
- Нажмите SET или, на некоторых версиях этого пульта, повторно OFF TIMER для подтверждения.
- Когда время перестанет мигать, таймер активирован.
- В 22:30 кондиционер выключится автоматически.
Схема:
OFF TIMER → ▲/▼ установить время → SET / OFF TIMER подтвердить
Как отменить таймер
Нажмите CANCEL. Значок таймера исчезнет с дисплея.
Главное: после выбора времени подтверждение нужно сделать примерно в течение 60 секунд, иначе настройка может не сохраниться.